Advertising on Facebook is becoming more and more sophisticated to the point that you now have many different options to help you build your audience, get followers attention and drive traffic to your website.
If your goal from advertising on Facebook is to drive website traffic and conversions, then installing and taking advantage of Facebook Pixel is a must.
What is Facebook Pixel
The Facebook Pixel is a piece of code that you install on your website. It allows you to more effectively measure the performance of your ad campaigns and it helps you determine exactly who sees your ads.
The features and benefits of Facebook Pixel include:
Ability to track customers across devices
More effective targeting
Create custom audiences for retargeting
Uncover niche segments that are similar to your current ones
Dynamic remarketing of ads – people who visit your site will see your ads on Facebook
Audience insights
Getting started with Facebook Pixel
To install Facebook Pixel, go to the link below to create your Facebook Pixel.
There are 2 types of code you have to install on your site to complete this process.
The first is the pixel base code that goes on all of your pages.
The second is the event code which you place on certain pages that you want to track specifically.
Creating Your Facebook Pixel
Facebook is going to step you through a process to set up your pixel and to get the codes for your site.
Installing Facebook Base Pixel on Your Website
The next step is to choose which method you want to use to install the Pixel on your site:
1. Using a tag manager 2. Copy and paste the code
In order for your Pixel to work, you must copy and paste the code into your website. This cookie allows your site to send information back to Facebook and measures visits and where people go on your site.
We prefer to copy and paste the code into the website rather than using a tag manager because that way you have more control over things that can go wrong but if you are not familiar with the code of your site you might want to go with the first option. There are also several WordPress plugins that facilitate this.
Facebook generates a handy dandy Facebook Pixel ID and instructions to send to your webmaster. The code has to go on every page of your site for it to work properly. The best way to do this is to install it in your header file somewhere between the <header> and </header> and before the <body> tag.
Pixel Events Code
The Facebook Pixel events code tracks specific actions on your pages. The first thing you need to think about is your website’s call to action – what is it that you want people to do on your site? There are 3 options in the setup process.
Basic – lets you track events and optimize for conversions based on people who take action on your site.
Recommended – includes all of the above along with basic parameters providing additional data and measurement parameters.
Advanced – adds an extra layer to include product level granularity (i.e product type, style).
Here are the standard Facebook Pixel options:
View content
Search
Add to basket
Add to wishlist
Initiate checkout
Add payment info Make purchase
Lead
Complete registration
Choose the most appropriate of these depending on your goals for website traffic, conversions and what it is you want to track.
Once these pieces of code have been installed on your site you will get a Facebook notification.
You can check to see if your Pixel is working by going to your Facebook Ads Manager. There you will notice a new Pixel tab.
Click on it to see your Pixel Fires (total amount of pixel activity in the date range).
To troubleshoot or validate your Pixel set up, there’s a useful Chrome add-on called Facebook Pixel Helper.
Facebook Pixel Next Steps
Now that you’re all set up with Pixel, it’s time to create audiences and track conversions.
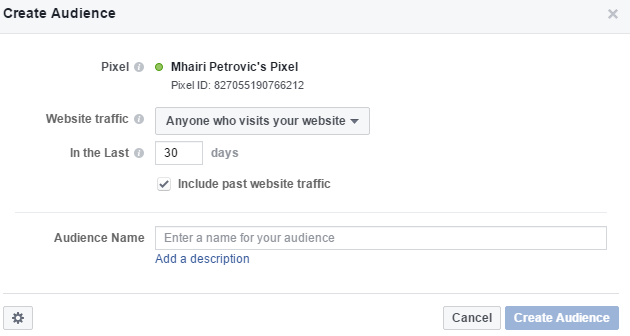
Create Audience
This allows you to target your Facebook ads to audiences of people who have visited your website and lets you remarket to them.
From your Facebook Ads Manager click on Pixel then on the ‘Create Audience’ button. Audience options include:
• Anyone who visits your site • People who visit specific pages • People who visit specific pages but not others • People who have visited in a certain amount of time • Or, you can create your own custom combo.
Decide which option best fits your needs, name your audience and that’s it. You are ready to create your first remarketing ad on Facebook but first, you have to wait till your custom audience is big enough.
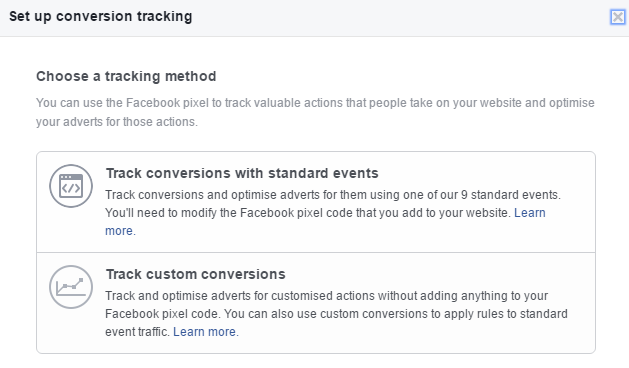
Create Conversion
From your Facebook Ads Manager, click on Pixel then again on the ‘Create Conversion’ button.
This time you have 2 options:
Track conversions with standard events – use this if you simply want to track and optimize conversions and build your audience.
Track custom conversions – use this if you can’t use standard events on your site or if you want to split conversions on your site.
Okay, so you’ve developed a presence on Facebook for your business and want to start using Facebook Ads, but where do you start? How do you advertise on Facebook? When you start delving into Facebook’s advert guides, it can all feel a bit confusing, but don’t fret! We are here to help guide you through the process. Since our last post about how to advertise on Facebook, their Adverts are still a very strong tool, but now with more options. Follow these tips and you will be up and be advertising on Facebook in no time.
Facebook Reach / Audience
Before we begin, let’s take a look at Facebook’s stats, which are quite impressive. Back in April of 2012, Facebook bought Instagram and as a result, it has opened up your reach to a wider audience. This means you can link your business’ Instagram page to your Facebook Advert account and your ad will automatically show up on both platforms. Together Facebook and Instagram have almost 2 billion users visiting their sites each month. Even with competitors like Twitter, LinkedIn and Snapchat, Facebook is still number one when it comes to the number of users and potential consumers.
Do You Have a Facebook Business Page?
Before you start, make sure you have a Facebook Business Page as you cannot create ads via your personal Facebook page. While there are a number of ways to access Facebook ads, we recommend signing up for “Business Manager” and creating an “Adverts Manager” account to design and manage your ads. One of the benefits of doing it this way is that it allows businesses to give access to multiple people working together on an advert campaign and to easily see who is working on what. You can even assign your employees specific role-based access to adverts in order to control what they can see on your account. Once you’ve signed up for an Adverts Manager account it will walk you through each step.
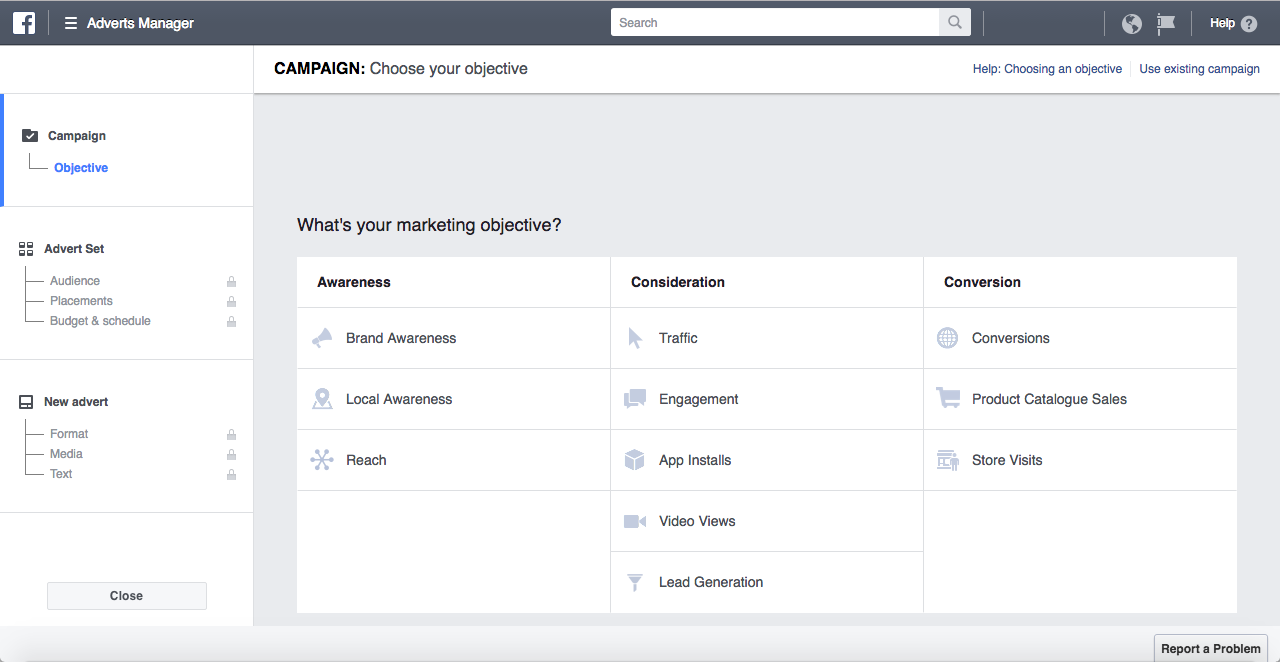
Determine Your Marketing Objective
Every campaign starts with an objective so determine what yours is. Not sure? Facebook helps you determine your marketing objective by defining each type of objective they offer to help guide you to the outcome you want for your campaign. When you are setting up your ad campaign, you will see a list of all the possible objectives (see image below). You can click on each objective for its definition to help you decide which one is best for you and your business goals.
For more detailed information, read Facebook’s “Advertising Objectives” article in their help section.
Some of these options offer what Facebook calls a “split test” which is also known as A/B Testing. It allows you to create two adverts to test and compare which one does better. Speaking of testing, it’s always a good idea to test two adverts at the same time. They should only have one to two different variables such as different images. Run them for 1-2 days and see which one does better.
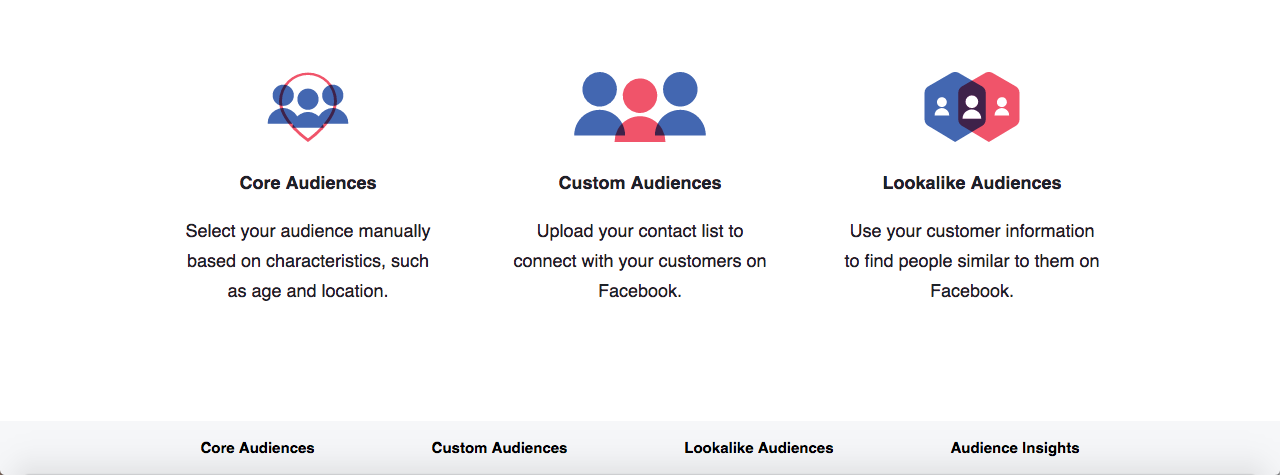
Define Your Audience & Advert Placements
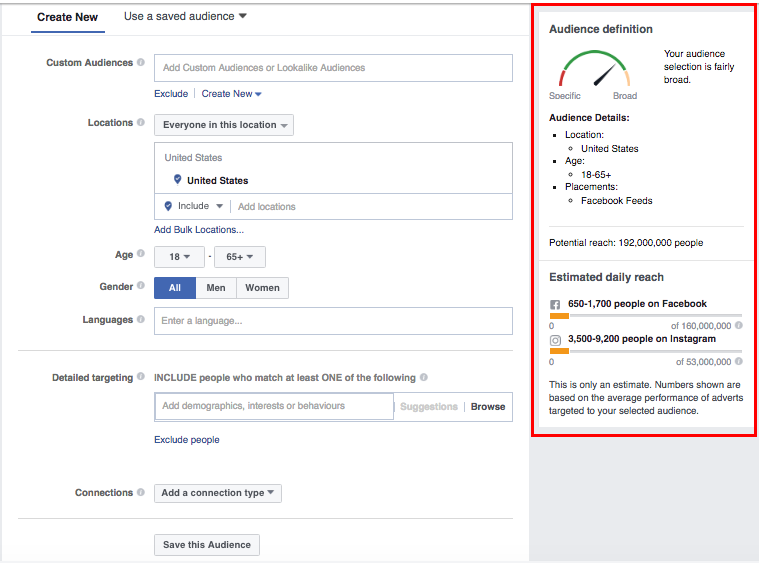
After you have identified your objective, the next step is to identify your target audience. Facebook makes it easy and steps you through the process. This is where you will spend most of your time defining whom it is you want to reach with your ads.
You choose your audience based on demographics, their behaviours, interests, and/or their contact information. There is a handy-dandy Audience definition (graph) to the right-hand side of the audience page (see the image below for an example). Use it to gauge how well you’ve defined your target audience. It will tell you the difference between how many people you are actually reaching versus how many people you could be reaching. To reach more of your targeted audience, increase your bids and budget.
You can also choose where your adverts will be placed or you can let Facebook automatically select this for you. We recommend that you select “Automatic Placements” when you first start out. The available placements are:
Facebook feeds (mobile and desktop)
Facebook right-hand column
Instagram
Audience Network
Know Your Ad Budget
It’s important to know your budget before you start creating your advert campaign. Facebook has an ad for every budget making it affordable for everyone. It’s also important to know that there are two different types of budgets: Daily Budgets and Lifetime Budgets.
A Daily Budget is what you’re willing to pay for an ad per day. What you spend on the first and last days are prorated depending on the run time for those days. Meaning what time did the ad start on day one and what time did it end on the last day. Those two times may be different which is why the cost is prorated. The default minimum cost per day is still $1.00 for Daily Budgets. However, that doesn’t mean you’ll be charged $1.00 every day your campaign runs. For example, one day it might be $1.50 and another day $0.50 to maintain an average daily budget of $1.00. You can increase your daily budget to improve your ad’s exposure and reach. Remember, Facebook will always let you know the maximum amount you’ll spend during your campaign, so you don’t have to worry about going over budget.
A Lifetime Budget is what you’re willing to pay over the duration (lifetime) of an ad. Facebook tries to apply your budget evenly over the length of time the ad runs. The default minimum cost for Lifetime Budgets is $30.00, and like the Daily Budget, you can increase it to any amount you want which will improve your ad’s exposure and reach. Whether your ad runs for a week or a month, the cost will be at what you set it.
If you are just starting out, using the default Daily Budget option of $1.00 or even increasing it to $5.00 is more than enough to test the waters and see what works and what doesn’t. You can always change your budget once you’ve figured out which ad campaigns have worked the best for you.
Schedule Your Ad
Don’t forget to choose a schedule. There are two options:
Run my advert set continuously starting today.
Set a start and end date.
It’s up to you which option you choose, but if you’re someone who is a tad forgetful, then choose a specific time range. You can always stop the ad whenever you want. Remember the length of time your ad runs, also affects your budget. The longer it runs, the higher the cost. We recommend that you run an ad for no more than 3 weeks as Facebook ads tend to get stale by that point. You can always replace it with a new ad campaign with fresh images and text.
If you’re wondering how Facebook determines the cost of their ads, well it’s a bit complex and it doesn’t help that Facebook is constantly adjusting their formula. The exact cost associated with your advert being shown to someone is determined in Facebook’s Advert Auction. To learn more about it, read “Understanding how bidding and our ads auction work.”
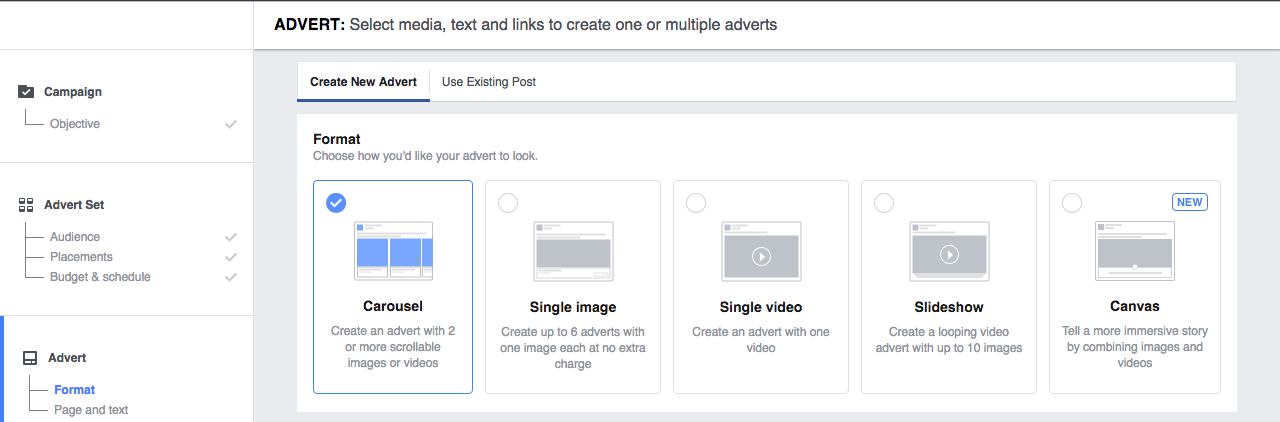
Choose a Facebook Advert Format
Facebook adverts offer more format options than ever before. There are five to choose from: Carousel, single image, single video, slideshow, or Canvas. While most of these formats are self-explanatory, Carousel and Canvas are not.
Carousel lets you show up to 10 images and/or videos in a single ad. When people view your ad, they can scroll through the carousel cards. One of the benefits of Carousel is that it lets businesses tell a story through carousel cards or to showcase one long image that is divided between the carousel cards.
Canvas is Facebook’s newest format and it allows you to combine both images and video. You can tell a more in-depth story about your products and/or services. It is customizable and there is no one way to create a Canvas ad. If you choose to design a Canvas ad, it’s best to plan in advance what type of experience you want to create for the viewer and to have all your media materials ready in advance.
Your ad will appear on desktop, mobile news feed, feature phone, and Instagram, so it’s important to follow Facebook’s guidelines when designing your ad. You want to ensure it looks good everywhere it appears whether it’s on Facebook, Instagram or your mobile phone. Listed below are the recommended design guidelines to ensure your ad displays the way you want it to:
Recommended image size: 1,200 x 628 pixels
Image ratio: 1.9:1
Text: 90 characters
Headline: 25 characters
Link description: 30 characters
Your images should have minimal amounts of text. Facebook adverts that contain images with little to no text tend to cost less and have better delivery than adverts with image text. So, what count’s as text in your advert image? Logos, watermarks, and numbers.
For a comprehensive list of design guidelines for each marketing objective, read Facebook’s “Adverts Guide.”
It’s easy to use your own images. Just remember to size them properly beforehand otherwise, they won’t upload or they will be cropped. Don’t have any of your own photos? You can use the free stock images provided by Shutterstock via Facebook.
There are three areas on your advert to add text: Text, Headline, and Link Description. You don’t have to use all of them. What text you include is up to you, but it’s always a good idea to have a call to action. You can even use Facebook’s “Call to Action” button which offers a number of options such as contact us, learn more, download, signup, and etc.
You now have the option to add a Facebook Pixel to your ad campaigns. The Facebook Pixel is a piece of code that you install on your website. It allows you to more effectively measure the performance of your ad campaigns and it helps you determine exactly who sees your ads. Learn more about it in our blog post, “How do Facebook Pixels Work – Getting Set Up.”
While designing your ad, there is an advert preview pane to the right that updates every time you make a change. There is also a drop down menu that shows you what your ad looks like on other platforms or you can use the arrow buttons to scroll through. You can experiment with your ad’s format, images, videos and text until you are satisfied with the results. You can make your advert as fancy or simple as you like.
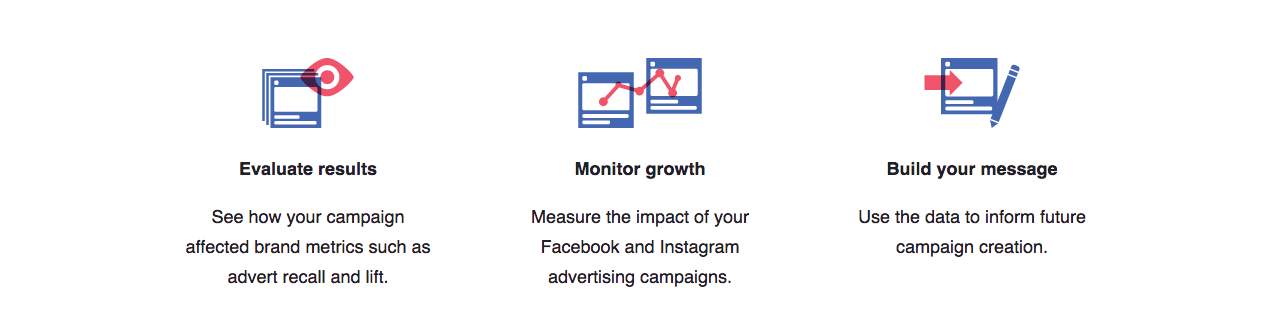
Tracking The Results of Your Facebook Ads
Okay, so you’ve created your ad, hit the “Place Your Order” button and it has been reviewed and accepted by Facebook. What’s next? Track and measure the performance of your advert campaign using Facebook’s adverts analytics tools. Information is presented in easy and simple visual reports. Your report includes topics such as reach, actions taken, details on the audience that you reached and more. Reports are also tailored based on which marketing objective you chose. Use these analytic tools to determine if your campaign was a success and met your objectives and goals. The data can also inform your future campaigns.
Are you ready to get started? Need help? Just let us know. Facebook ad creation and management is just one of the many services we provide.
About the writer: Gloria Botelho is a practicum student from the Digital & Mobile Marketing program at Simon Fraser University. Gloria lives in East Van and is obsessed with cats, flowers, street art and all things Portuguese.
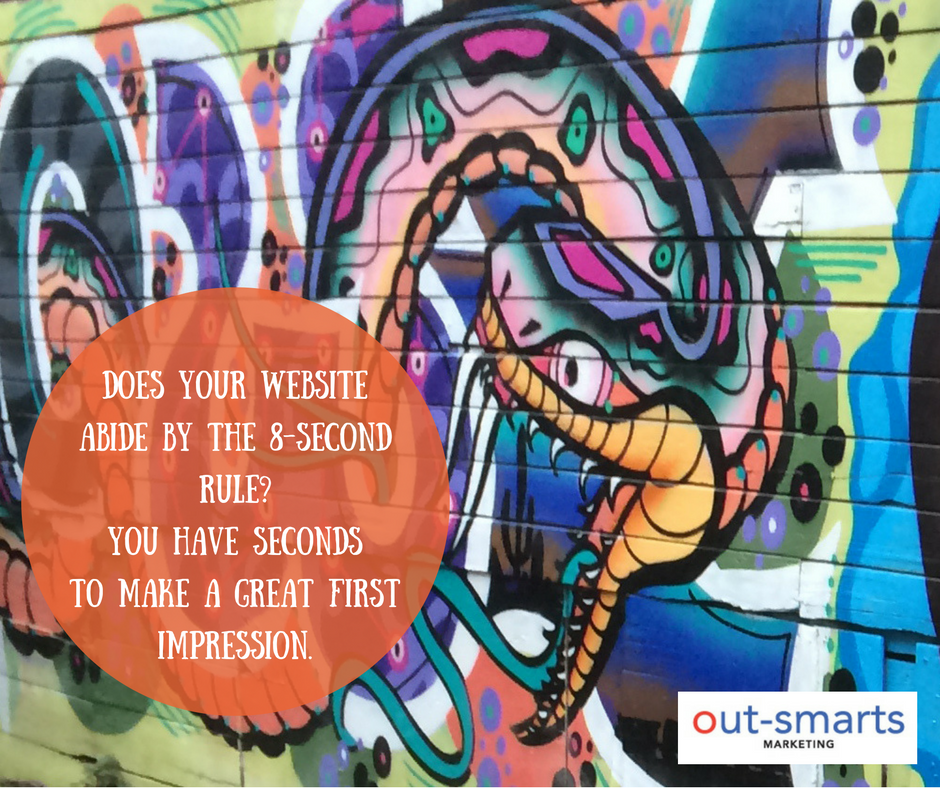
You have seconds to convince a first-time visitor to stay on your website. Approximately 50% of them leave within those first 8 precious seconds for a number of reasons, but there are ways you can reduce your website bounce rate.
Your website should make the best first impression so that it convinces visitors to stay. Keep them on your site and lower your website bounce rate with these 4 tips:
1) Speed Up Website Load Time
There are a number of sites that can measure your website’s load time. The quicker your website loads, the less likely a first-time visitor will leave. A couple of sites we recommend are Pingdom and Google’s PageSpeed Insights.
Pingdom has a free toolto test your website’s loading time. It’s simple and easy. Enter your website’s address, select a location and Pingdom analyzes it, gives you a performance grade and identifies in a detailed report what may be slowing down your website’s load time.
Google’s PageSpeed Insights is also free and just as easy. You type in your website URL, click on the analyze button and wait for the results. You will receive two performance reports; one for desktop and another for mobile both of which have their own a PageSpeed Score that ranges from 0 to 100 points. Side note: your website should be optimized for mobile devices – which includes both smartphones and tablets – otherwise your website may not show up on Google Search results on mobile. The reports give advice on what to fix and how to fix it to make your website better and lower your website bounce rate.
2) Define The Purpose of Your Site
Your website should solidify your online identity and your services and/or products should be clear and obvious. The top left hand corner is the most important part of your site – use it to showcase what you do and define your purpose so that visitors get it instantaneously. Showcase what you do and who you do it for.
3) Simple Website Navigation & Layout
Keep your website simple, make it intuitive to use and design it to be desktop and mobile responsive. These elements will keep first-time visitors on your site longer and make them less likely to bounce (leave after visiting only one page). Have all information about your products and/or services on your website.
Another way to reduce your website bounce rate is if you keep getting asked the same questions, then it is a good idea to make that information available on your website too because people would rather move onto another competitor’s website to find the answer than to call up your business.
You should have two sitemaps – one for Google (XML) and the other for people. It is paramount that people can find the content they are looking for on your site easily, so don’t overwhelm them with links. Too many links and menu items can cause confusion and result in people leaving your site if they have to keep clicking around to find what they were looking for. Pages should be linked from the menu or from inner pages (to help Google crawl them all).
Include easy to find contact information on every page of your website. Having an address, phone number and email in plain sight makes visitors feel that they are dealing with an actual business.
4) Give Website Visitors Reason to Come Back
Provide dynamic content such as blog posts, images, videos and etc. Use a blog to set yourself apart by showcasing you’re an expertise in your industry and how you will deliver on their expectations. If you can offer valuable information like giving free advice this results in trust and goodwill. It will bring visitors back to your website and increase the likelihood that they will retain your services.
Videos are great for boosting conversions and return visits too. Use videos to highlight a new product or explain your business. Make sure though to keep videos short – less than 2 minutes – so visitors stay to watch.
Differentiate your website and business by having a distinctive logo and by sharing consumer reviews so that visitors don’t go searching for reviews about your company on other sites that you don’t have control over.
Lastly, update your site often. An active and fresh website will not only make first-time visitors stay, but come back again and again.
Conclusion
Take a moment to look at your website from the perspective of a first-time visitor or better yet, have a friend do it. Identify what your website may be lacking from what we’ve outlined above. Implement some of these tips to reduce website bounce rate and see if it convinces more visitors to stay on your website longer than 8 seconds. Some of these changes will be easy to put into action and others you may feel are too technical. If that’s the case, contact your web developer or give us a shout – we’d be happy to help.
About the writer: Gloria Botelho is a practicum student from the Digital & Mobile Marketing program at Simon Fraser University. Gloria lives in East Van and is obsessed with cats, flowers, street art and all things Portuguese.
Search Engine Optimisation (SEO) isn’t something that should happen as an afterthought. If you are planning a blog post, a new page on your small business website or other content such as an event, new product or service, it is important to consider SEO right at the start. If you do so then your post, page or listing will be more relevant, in demand and it will get more traffic, visitors and shares. What is there to lose? Here’s a Small Business SEO Checklist to make this easy for you and to help you stay on track with some of the simple SEO tactics that can help your post, page or listing get found:
Small Business SEO Checklist
1. First determine what your blog post is going to be about and draft some pertinent keywords – i.e. words that your clients might use to search for your content and that describe what your post is all about. Go with your gut instinct and think about the words your customers use when asking you about this topic.
2. Use Google Trends to determine whether people are searching for these words or phrases. Google suggestions is also a great way to determine if this is a good topic, just start entering your word or phrase in Google and see how it completes it in the search dropdown that shows up. The suggestions that show up first are the most popular searches relating to your keyword. If you want to go really deep you can use Google Adwords Keyword Planner tool to determine the competition and value of your intended words or phrases (which isn’t ideal as it’s based on data from paid advertising and not overall search), or even better, a tool like Keyword Explorer from MOZ.
Another even easier way to determine the competition for a key word / phrase is to Google it and see how many results there are.
Your goal in this step is to determine phrases or words that have a high volume but low competition.
3. After doing the research in 2 above, determine a) your focus keyword / phrase, and b) secondary keywords that apply (use these in the text when writing your content). Craft your text and content around these.
4. To make it more likely that your page or post will be found when people search for it, the word / phrase that you have identified as your focus keyword / phrase should be used in the:
Title of your post
META title
META Description
Focus keyword
Alt Tags of your images
Text of your page – but not repetitively – you are writing for people not search engines! A good rule of thumb is 3 – 6 times for a 300 – 600 word post or page
In your headers and subheadings
URL
Yoast is a great tool to help you with this, if you are using WordPress I highly recommend it.
5. The META on your site might be the first impression anyone sees of your small business so take a little extra time to craft it well. When entering your META follow the META tag rules below- if you are using Yoast this plugin will help you with this:
Your META title (in purple in the image below) should be less than 56 characters, META description (below the URL in grey on the below) should be less than 156 and it should compel people to click.
The focus keyword phrase we’ve used in this post is Small Business SEO Checklist FYI!
SEO is Important
I meet a lot of people who think SEO is too technical so they simply avoid doing it but it doesn’t have to be and ignoring means you are losing out on lots of potential visits and shares. I hope that this simple Small Business SEO Checklist will encourage you to add SEO to your posts and pages. Doing so could be huge for your site and your business!
Listing your business on Google is a great way to help you get discovered and it also goes a long way to validate your business. In Canada most of us use Google to search the Internet so having a presence there is vital.
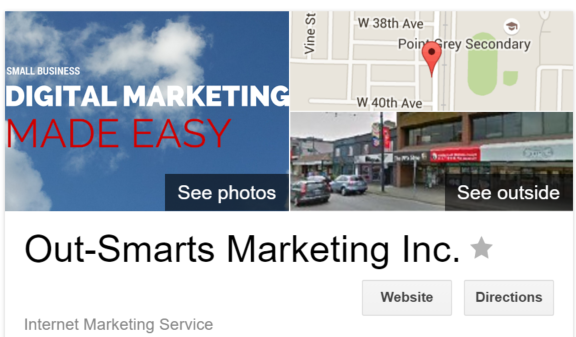
To find out if your business is listed on Google, simply Google the name of your business. If the right results show up on the right hand side of the page then you’re listed thanks to Google. Checking this before setting up a new one helps avoid the headache of duplicate listings.
Note that if you’ve ever set up a Google + page then you likely have a Google business listing and you may have 2 since Google also set up a bunch for every business it could find.
Listing your business on Google / claiming Your Google Listing
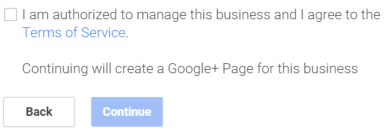
Once you’ve determined whether you have a page or not, go here to create your listing OR click on ‘Claim this listing’ (you’ll find this below your phone number on the results to the right of your screen when you Google your business name).
Google will step you through a process to verify your name address and location. Make sure all of the details are correct then click on the check box to verify that you are authorized and that you agree to the terms of service. Google will then call you with an automated message giving you the four digit code you need to complete the verification process.
Note that this will set up your business listing AND your Google+ page as well as Google maps.*
Once you are set up you should add more detail about your business along with photos, and your logo to brand your presence.
*It is important to differentiate between Google+ which is Google’s attempt at a social network and Google My Business which is a directory. You should have both and they should be linked so when you are setting them up remember to login and use your Google account when stepping through the process (the one you use for Adwords and Analytics too!).
Why you should have a Google Business Listing
1. Gets your business discovered online locally – and this is huge 2. It shows the world that you are for real! 3. Provides valuable links from Google back to your website 4. Helps your customers quickly and easily find you both online and off
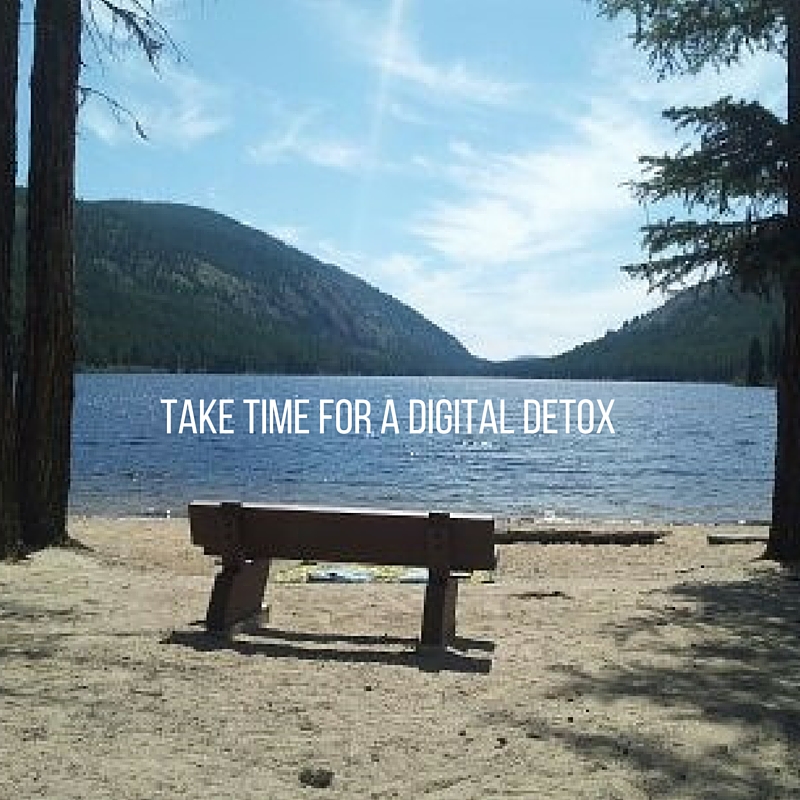
This weekend at PowHERhouse speaker series in Sechelt, I spoke for 9 minutes about how important it is to take a digital detox. As a digital marketer I’ve learned this lesson the hard way (and take it from me, I am still learning). I was surprised by how many people came up to me after and thanked me for putting this in perspective for them too. My message seemed to resonate so I am sharing it with you here.
We now have access to more information than all previous generations combined. The ubiquity of digital technology can be a blessing and a curse. One the one hand we can connect with practically anyone in the world and find the answers to our questions in an instant but on the other our faces are stuck in our phones and we’re distracted by frivolities that don’t really matter.
I’m on a crusade to help people put digital technologies back in perspective and put us back in control.
Turn it off! – do you really need to take your phone to bed and keep it on all night – what’s so important that it can’t wait till morning?
Leave it behind – going out for a meal or a walk – leave your phone behind and focus on the people in front of you.
Stay focused – know what is it that you want to use digital media for. Whether it be for growing your business or simply keeping in touch with your friends, bear your goals in mind when online.
Be selective – about who you connect with (quality is better than quantity!), which tools you use (you can’t use them all well and grow a business too!) and when you use them (see 1 above!).
Listen out for what matters to you – you don’t need to read every single post in your timeline or any of them even. If you are using social media for business hone in on replies, likes, comments and shares (RT’s).
Keep this in mind when posting: If its not worth saying out loud its not worth saying online.
Set some ground rules for you and your family. No phones at the dinner table is one of ours.
Take a digital detox – schedule a block of time (not during sleep hours!) or better yest, a day, to turn of all devices and make some real world connections (with your family, nature, yourself…).
Leave a comment below and let us know when you digitally detox and how you feel when doing it.
Yesterday I was invited, at the last minute, to join a panel of articulate and gifted women to present and discuss women in leadership for the Women in Leadership Foundation mentorship program here in Vancouver. I was honoured to be part of such an esteemed group that included Cindy Hogg – Moving the Human Spirit, Agnes Garaba – SAP – Head of HR Canada, Stephanie Redivo – GIRLsmarts4tech & SAP – Senior Project Manager and Ingrid Kastens – Executive Director Pacific Community Resources Society. As is often the case with me, I jumped in with both feet without giving it much thought then began to panic: “what will I say”, “what do I know about leadership” said the pesky voices in my head. So I broke it into bite sized chunks.
Thanks to Gwen Gnazdowsky for facilitating this great event and to Sherry Baumgardner for sharing the lovely photos below.
What Leadership Means to Me
For me leadership is all about sharing my knowledge with others so that they can learn from me and from the mistakes and successes I’ve had along the way. It is also about learning from the experiences and knowledge of thought leaders – people to whom I am very thankful to every day because they share their insights and help me stay abreast of developments in such a fast changing industry (shout out to Mari Smith, Chris Brogan, Brian Solis, Seth Goden, Mitch Joel, Scott Stratten and all the influencers who tirelessly lead and share).
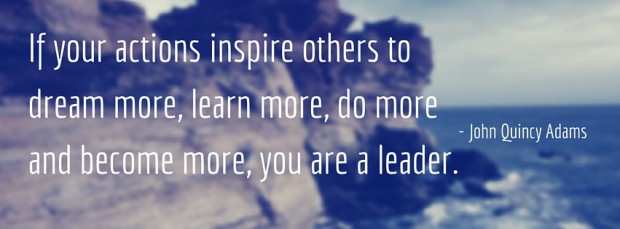
Leadership is all about inspiring others to do great things but it’s not about doing it for them nor is it about forcing them to do things your way. I’ve had some great bosses over the years but not all of them have been great leaders (or even good ones for that matter!).
Leadership and Social Media
Social media gives us a vehicle to lead and to be influenced like never before. We live in a time when technology allows us to inspire others and lead in brand new ways. Twenty years ago leadership was more about personal one on one connections. You could read books by leaders but there was little or no interaction. You could influence and be influenced by colleagues, bosses and partners but it was difficult to influence a wider audience.
I am not saying that personal, one on one leadership connections are no longer important to leadership (they are still paramount) but now things are different and we’re so fortunate to live at a time when we can augment personal relationships to influence, interact and collaborate with like minded people across the globe online.
During our panel the other speakers talked about connections, about trust, about corporate culture, about partnerships and about inspiring creativity. Social media enhances our ability to do each of these.
Key Components to Social Leadership
1. Connections – social media allows us to connect with younger generations in the forums they are most comfortable with so that we can help and influence them in positive ways. It also allows us to connect and learn from those influencers, to grow those connections into valuable relationships and to take advantage of their sage advice to have a positive impact on you and your career or business. Humans have produced more information in the last 2 years than ever before but if you are following the right people rather than haphazardly following everyone and anyone you will be exposed to great content.
2. Content – social media allows us to share our wisdom and learnings and to disseminate great content that we find online with other interested parties. One of the purposes if this blog is to share content that is valuable and might inspire other businesses and marketers. As an influencee, the ability to listen effectively is key here, to know how to use hashtags and lists.
3. Communication – social media allows us to communicate with much wider audiences and to connect one on one or one to many like never before. Effective communication is the top attribute for effective leadership and yet many CEO’s who have the opportunity to do so don’t or won’t. Blogging, Twitter, Facebook, LinkedIn and YouTube offer leaders a vehicle to communicate and influence in very personal and positive ways.
Social Leadership and Inspiration
As someone who runs a small company working with select clients, the opportunity to talk on this panel got me thinking about the ways I lead. I was surprised to realise that whilst I don’t always have the opportunity to lead many subordinates in traditional hierarchical, corporate leadership roles (and I am quite glad of that!), I lead in other ways. Practically everything I do from influencing and assisting clients, partners and associates to grow online, to sharing blog posts, to Tweeting valuable content, to mentoring other women and to speaking and teaching, is intended to unfluence and inspire others in positive ways and for that opportunity I am grateful.


 Key Components to Social Leadership
 2. Content – social media allows us to share our wisdom and learnings and to disseminate great content that we find online with other interested parties. One of the purposes if this blog is to share content that is valuable and might inspire other businesses and marketers. As an influencee, the ability to listen effectively is key here, to know how to use hashtags and lists.